Have you ever walked across your PVC flooring and noticed a dent, scratch, or even a slight discoloration? These small issues can be incredibly frustrating, casting a cloud over the beauty and function of your flooring. What’s worse, if left untreated, they can turn into bigger problems that could require a complete replacement. The good news? These problems are generally easy to fix if caught early and dealt with properly.
Rest assured, you’ve come to the right place. This article provides a comprehensive, step-by-step guide to quickly and efficiently fix common problems with PVC flooring. From identifying the issue to gathering the right tools and materials, all the way through to the actual fixing process, we’ve got you covered. So, if you’re looking to restore the charm of your PVC flooring without breaking the bank or investing hours of your time, keep reading. This guide is designed to give you all the information you need in a simple, easy-to-follow manner.

Understanding the Damage
Before you roll up your sleeves and dive into fixing your PVC flooring, it’s crucial to understand the damage’s type and extent. Taking the time to assess the situation carefully will save you time and resources and help ensure that you get the job done right the first time.
Possible Types of Damage
There are several types of damage that your PVC flooring might encounter. These include:

- Scratches: Usually caused by moving furniture or heavy foot traffic.
- Punctures: Sharp objects like heels or pet claws can cause these.
- Dents: Heavy furniture or appliances sitting in one place can lead to this issue.
- Stains: Food spills, chemical exposure, or water can leave marks.
- Discoloration: Often due to prolonged exposure to sunlight.
Having been through the rigors of flooring maintenance and repair myself, I can attest to the different challenges each type of damage presents. But with the right approach, each is manageable.
Identifying the Extent of Damage
After identifying the type of damage, the next step is to determine its extent. Is it a localized issue, affecting only a small section of your flooring, or is it widespread? Knowing the extent will guide you in choosing the right method and materials for repair. You wouldn’t want to rip up an entire section of your flooring when a quick patch job would suffice.
Importance of Assessing the Damage Before Proceeding with Repairs
Don’t underestimate the importance of this assessment phase. Jumping right into repairs without a proper evaluation could lead to unnecessary costs and labor. This assessment helps you narrow down the specific tools and materials you’ll need, which can be invaluable if you want to complete the job as efficiently as possible.
Gathering the Necessary Tools and Materials
Once you’ve accurately assessed the damage to your PVC flooring, the next crucial step is gathering all the tools and materials you’ll need for the repair job. It’s always better to have everything at hand before you start, saving you from unnecessary disruptions that can break your workflow.
Required Tools and Materials for PVC Floor Repairs
Here’s a list of basic tools and materials commonly required for repairing PVC flooring:

- Utility Knife: For cutting and trimming the damaged sections.
- Tape Measure: For precise measurements.
- Flooring Adhesive: Specifically designed for PVC.
- PVC Floor Patch: For filling in dents or holes.
- Fine-grit Sandpaper: To smooth out patched areas.
- Clean Cloth: For cleaning the surface before and after repairs.
- Rubber Mallet: To gently tap the new material into place.
- PVC Cleaner: For removing any residue or stains.
In my years of hands-on experience dealing with PVC flooring, these are the basic essentials I’ve found to be most effective for various repairs. Your situation might require additional or specialized tools, so always refer to your initial assessment.
Where to Buy or Rent These Items
You can usually find these tools and materials at your local hardware store or home improvement center. Online retailers also offer a wide range of options, often with user reviews that can help you make an informed choice. If you plan a one-time repair and wish to save money, consider renting the more expensive tools from a local rental shop.
Safety Measures and Precautions When Handling These Tools and Materials
Safety is paramount, especially when dealing with adhesive chemicals and sharp tools. Always read the manufacturer’s guidelines for each product you use. Wear safety glasses, gloves, and a mask if you’re dealing with chemicals. Also, make sure the area is well-ventilated during your repair work.
The protocols I’m sharing here are based on standard safety guidelines and practices that I’ve consistently adhered to throughout my career in flooring repairs. These aren’t just best practices on paper; they’ve been tried and tested on the field for effectiveness and safety.
Step-By-Step Guide to Fixing PVC Flooring
After assessing the damage and gathering all the necessary tools and materials, you’re ready to begin the repair process. Below is a step-by-step guide designed to walk you through from start to finish, ensuring your PVC flooring looks as good as new.
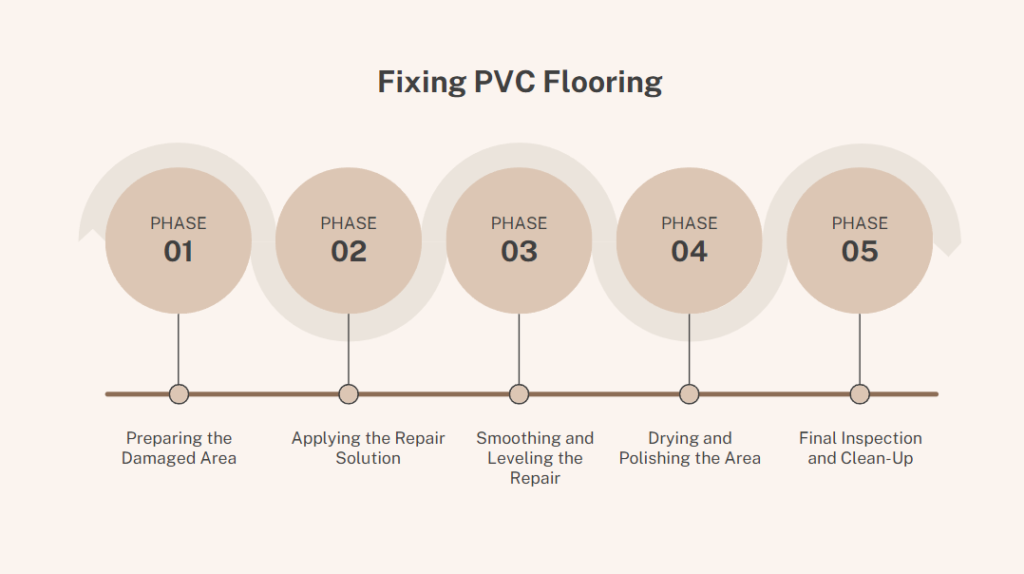
Step 1: Preparing the Damaged Area
The first step is to prepare the damaged area for repair. Start by thoroughly cleaning the surface with a PVC cleaner to remove dirt, dust, or residues. If you’re dealing with a scratch or puncture, use your utility knife to cut away any frayed or lifted edges carefully. I’ve always emphasized the importance of a clean working area in all my repair projects, ensuring the adhesive and patchwork bond well to the surface.
Step 2: Applying the Repair Solution
Now that the area is clean, you can apply the repair solution. Use a putty knife to apply the flooring adhesive specifically designed for PVC and apply it to the damaged area. If you’re patching a hole or dent, fill it with the PVC floor patch material. Remember, different types of damage require different application techniques. The nuances in adhesive application are something I’ve mastered through years of hands-on experience, ensuring that the repair blends seamlessly with the surrounding area.
Step 3: Smoothing and Leveling the Repair
Once the repair solution is applied, use your putty knife or a rubber mallet to smooth and level the surface. This step ensures that the repaired area blends seamlessly with the surrounding flooring. A fine-grit sandpaper can be used to smooth the surface further if necessary. The goal here is to repair as unnoticeable as possible, which comes with understanding the texture and finish of different PVC flooring types.
Step 4: Drying and Polishing the Area
Allow adequate time for the adhesive and patch material to dry. The drying time can vary based on the products you’re using, so follow the manufacturer’s guidelines. Once the area is dry, you can polish it using a clean cloth to return the shine and luster. This is an often-overlooked step that can make a difference in the final appearance of your repair job.
Step 5: Final Inspection and Clean-Up
Finally, inspect your work to ensure the repair is flush and blends with the surrounding area. Clean up your workspace, properly dispose of any leftover materials, and clean your tools. A good repair job isn’t just about fixing the issue but also about leaving no trace that work was done.
You’ve now successfully completed a PVC floor repair! The process might seem intricate, but each step is crucial for achieving a flawless result. These methods and tips are not just theoretical recommendations but are based on a foundation of real-world experience and a deep understanding of the materials and techniques involved. By following this guide, you can confidently tackle PVC flooring repairs, secure in the knowledge that you’re applying industry-best practices for a long-lasting solution.
Tips to Prevent Future Flooring Damages
Having gone through the process of repairing your PVC flooring, it’s equally essential to know how to prevent future damage. By following some best practices, you can extend the lifespan of your flooring and maintain its aesthetic appeal.
Guidelines on Proper PVC Flooring Maintenance and Cleaning
For day-to-day maintenance, sweep or vacuum the floor to remove dirt and debris. A damp mop with a mild cleaner specifically designed for PVC flooring can be used for deeper cleaning. Periodically, you can use a PVC cleaner to deal with more stubborn stains or residues. Based on my experience, regular cleaning prevents wear and tear that could eventually lead to damages requiring repair.
Dos and Don’ts with PVC Flooring

Here are some quick guidelines to keep in mind:
- Do: Use furniture pads under the table and chair legs to prevent scratching.
- Do: Wipe up spills immediately to prevent staining.
- Don’t: Use abrasive cleaners or scrubbers that can scratch the surface.
- Don’t: Drag heavy furniture across the floor.
Understanding the unique properties of PVC flooring can help you avoid common pitfalls that may lead to damage. Through years of managing flooring, these are some of the essential dos and don’ts I’ve found to be consistently useful.
Suggestion for Professional Maintenance If Damage Is Beyond DIY Repair

While DIY repairs can handle most minor damages, some require professional attention. If the flooring has extensive damage or you’re unsure about the repair process, it’s advisable to consult a professional. Sometimes, it’s more cost-effective to let an expert handle it than to risk further damage in a DIY attempt. Having navigated minor and major flooring issues, I can attest to the importance of professional assessment and repair when the situation calls for it.
Conclusion
In a nutshell, repairing your PVC flooring involves a sequence of deliberate steps: preparing the damaged area, applying the right repair solution, smoothing and leveling, and finally, drying and polishing. Alongside this, preventive measures can save you from future repair hassles. While the process may appear challenging, it’s absolutely doable with the right tools and guidelines. Should you find yourself faced with an issue that seems beyond DIY capabilities, don’t hesitate to consult professionals. Trust that this guide is grounded in hands-on know-how and best industry practices, aimed to equip you with the confidence to either tackle the repair yourself or make an informed decision to seek expert help.

